MapLibre Native for iOS serves as a toolkit, empowering developers to easily integrate dynamic map displays with scalable, adaptable vector maps of Galli Maps into their iOS applications.
In this guide, we'll walk you through the integration of Maplibre Native into your iOS application using SwiftUI with step-by-step examples.
1. Integrating GalliMaps with Maplibre
#### Step 1: Add Maplibre Native SDK
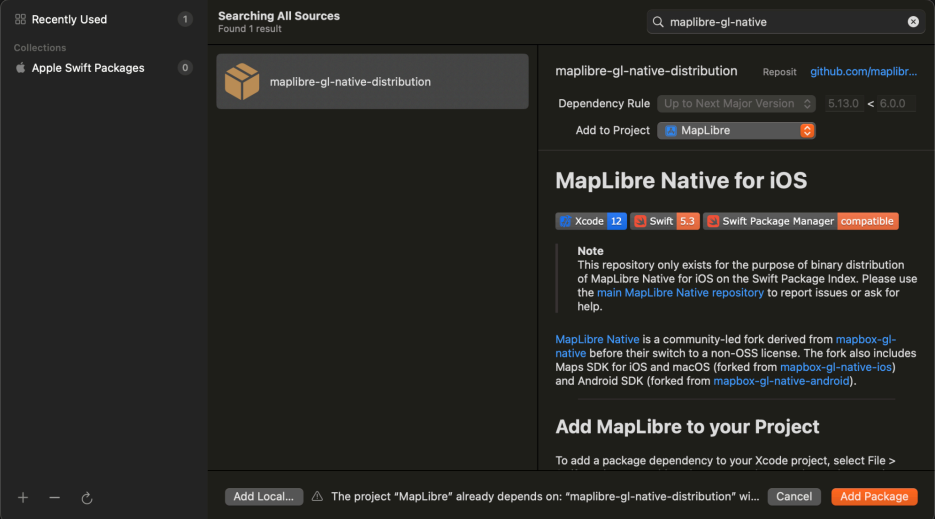
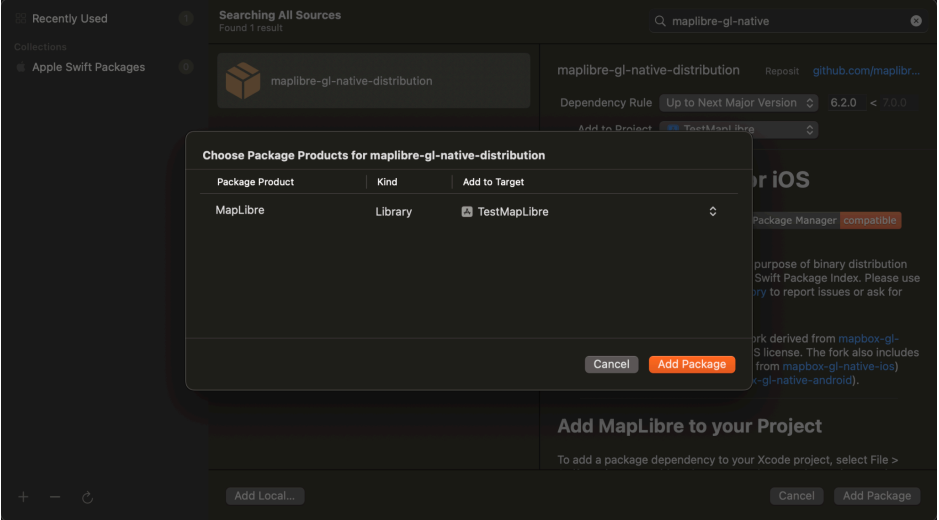
Add Maplibre Native SDK to your project using Swift Package Manager.- To add a package dependency to your Xcode project, select File > Add Package Dependency and enter its repository URL. You can also navigate to your target’s General pane, and in the “Frameworks, Libraries, and Embedded Content” section, click the + button, select Add Other, and choose Add Package Dependency.
- Either add Maplibre GitHub distribution URL https://github.com/maplibre/maplibre-gl-native-distribution or search for maplibre-gl-native package.
#### Step 2: Set Up MapView
Create `MapView` with UIViewRepresentable protocol. To load the map tiles, you will need to include an access token in the URL to authenticate and render the tiles onto the MapView.
import SwiftUI
import Mapbox

struct ContentView: View {
	var body: some View {
		MapView().edgesIgnoringSafeArea(.all)
	}
}

struct ContentView_Previews: PreviewProvider {
	static var previews: some View {
		ContentView()
	}
}

struct MapView: UIViewRepresentable {
	func makeUIView(context: Context) -> MGLMapView {

	// Build the style URL
	let styleURL = URL(string: "https://map-init.gallimap.com/styles/light/style.json?accessToken=$ACCESS-TOKEN")

	// Create the map view
	let mapView = MGLMapView(frame: .zero, styleURL: styleURL)
	mapView.logoView.isHidden = true
	mapView.setCenter(
		CLLocationCoordinate2D(
			latitude: 27.69818, longitude: 85.32385), animated: false)
			mapView.setZoomLevel(12, animated: false)
			mapView.isZoomEnabled = true

	// use the coordinator to respond to the map loaded event
	mapView.delegate = context.coordinator
	return mapView
	}

	func updateUIView(_ mapView: MGLMapView, context: Context) {
		// Update the view if needed
	}

	func makeCoordinator() -> MapView.Coordinator {
		Coordinator(self)
	}

	final class Coordinator: NSObject, MGLMapViewDelegate {
		var control: MapView

		init(_ control: MapView) {
		self.control = control
		}

	func mapViewDidFinishLoadingMap(_ mapView: MGLMapView) {
	// write your custom code which will be executed
	// after map has been loaded
		}
	}
}
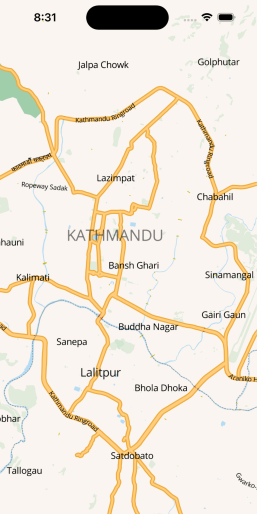
Loading Galli Maps' Vector Tiles
2. Pin Marker on Map [ Example ]
This example shows how to add a marker (pin) on the map at a specific geographical position defined by latitude and longitude. It creates a marker with options such as position and title, then adds it to the map. Add the following functions inside Coordinator class which uses MGLMapViewDelegate protocol.
	func createMarkerSymbol(_ mapView: MGLMapView, _ style: MGLStyle) {
        // Create point to represent where the symbol should be placed
        let point = MGLPointAnnotation()
        point.coordinate = CLLocationCoordinate2D( latitude: 27.69818, longitude: 85.32385)

        // Create a data source to hold the point data
        let shapeSource = MGLShapeSource(identifier: "marker-source", shape: point, options: nil)

        // Create a style layer for the symbol
        let shapeLayer = MGLSymbolStyleLayer(identifier: "marker-style", source: shapeSource)

        // Add the image to the style's sprite
        if let image = UIImage(named: "house-icon") {
            style.setImage(image, forName: "home-symbol")
        }

        // Tell the layer to use the image in the sprite
        shapeLayer.iconImageName = NSExpression(forConstantValue: "home-symbol")

        // Add the source and style layer to the map
        style.addSource(shapeSource)
        style.addLayer(shapeLayer)
    }
...
...
func mapView(_ mapView: MGLMapView, didFinishLoading style: MGLStyle) {
    self.control.createMarkerSymbol(mapView, style)
}
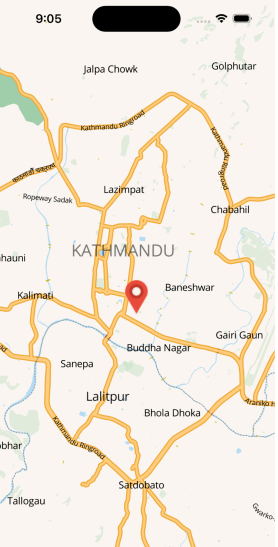
Pin marker on map
3. Draw a Polyline on Map [ Example ]
Here, we draw a polyline on the map by connecting multiple geographical points. It creates a polyline with options such as color and width, then adds it to the map.
func drawPolyline(_ mapView: MGLMapView) {
	let coordinates = [
	CLLocationCoordinate2D(latitude: 27.69818, longitude: 85.32385),
	CLLocationCoordinate2D(latitude: 27.66918, longitude: 85.32034)
	]
	let polyline = MGLPolyline(coordinates: coordinates, count: UInt(coordinates.count))
	mapView.addOverlays([polyline])
}
...
...
func mapView(_ mapView: MGLMapView, didFinishLoading style: MGLStyle) {
self.control.drawPolyline(mapView, style)
}
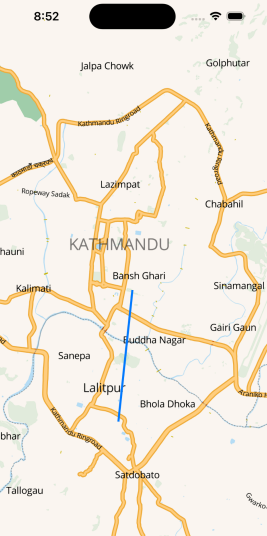
Polyline on map
4. Draw a Polygon on Map [ Example ]
Similar to drawing a polyline, this example demonstrates drawing a polygon on the map by defining its vertices (points). It creates a polygon with options such as fill and stroke colors, then adds it to the map.
func drawPolygon(_ mapView: MGLMapView) {
    let coordinates = [
    CLLocationCoordinate2D(latitude: 27.72441, longitude: 85.29000),
    CLLocationCoordinate2D(latitude: 27.72206, longitude: 85.34864),
    CLLocationCoordinate2D(latitude: 27.67013, longitude: 85.34181)
    ]
    let polygon = MGLPolygon(coordinates: coordinates, count: UInt(coordinates.count))
    mapView.addOverlays([polygon])
}
...
...
func mapView(_ mapView: MGLMapView, didFinishLoading style: MGLStyle) {
    self.control.drawPolygon(mapView, style)
}
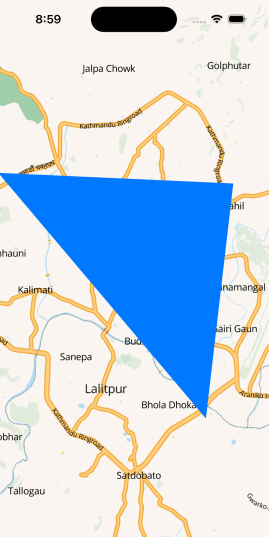
Polygon on map
For more information on maplibre sdk for iOS please refer to following page: Maplibre Native (iOS)